1.4 · Data contracts
Choosing Test Cases, and Proving They Catch Real Bugs
The previous post introduced golden vectors: saved example inputs, called scenes, together with the outputs the Python reference produces for them. Both the Python and the C feature code must reproduce those outputs, within a small tolerance, or the build fails.
That leaves an important question. A golden test with ten carefully chosen scenes and a golden test with ten random scenes print exactly the same thing when they pass: zero failures. So how do you choose scenes that catch real mistakes, and how do you know they work?
This post answers both parts. The first half explains how the ten scenes were designed. The second half breaks the C code on purpose, in ten realistic ways, and checks that the test catches each one.
The code is in edge-ai-toolkit/01-contract.
Each scene targets a specific mistake
A scene earns its place by targeting a particular way the two implementations could disagree. A scene that does not target anything adds running time without adding protection, and it teaches people that the test suite is mostly decoration.
Here are the ten scenes in the companion repo. Each one is a window of 100 readings across the six sensor channels.
| Scene | What the input looks like | The mistake it is designed to catch |
|---|---|---|
all_zero | Every reading is 0 | Treating a reading of zero as missing |
channel_distinct | Each channel holds a different constant value | Channels swapped, or results written to the wrong position |
scale_split | Every channel holds the same value | Accelerometer and gyroscope conversions swapped |
alternating | Readings alternate between +1000 and -1000 | The wrong standard deviation formula |
ramp | Each channel rises steadily at a different rate | Any two statistics confused with each other |
impulse | A flat signal with one large spike | Minimum and maximum mixed up, or a reading skipped |
negative | Every reading is negative | Minimum and maximum started at zero instead of the first reading |
some_missing | Some readings are marked as missing | Missing readings averaged in as if they were real |
all_missing | One channel is missing entirely | A missing channel reported as zero |
realistic | Random but repeatable motion | Anything the simpler scenes miss |
Most of these are easy to understand from the table. For example, the
scale_split scene puts the same number of ticks on every channel. The
accelerometer and the gyroscope convert ticks into different units, so the
correct output contains two distinct groups of values. If the conversion
factors were swapped, the two groups would trade places, and every value
would still look believable on its own.
Two of the scenes need a fuller explanation, because they target mistakes that most people do not think to test.
The alternating scene and the standard deviation formula
The standard deviation measures how spread out values are around their average. There are two common versions of the formula, and they differ in one detail:
- The population version divides by the number of readings,
n. - The sample version divides by
n - 1.
Statisticians use the sample version when estimating the spread of a larger group from a small sample of it. For a feature calculated over a window, either version works, as long as both sides use the same one.
The difference between them is a factor of sqrt(n / (n - 1)). With 100
readings per window, that makes the sample version about 0.5% larger.
Here is the trap: two popular Python libraries use different defaults.
numpy.std(x)          # population: divides by n      (ddof=0)
pandas.Series.std()   # sample:     divides by n - 1  (ddof=1)
The setting that controls this is called ddof, short for “delta degrees of
freedom”. If someone writes the Python reference with pandas instead of
numpy, every standard deviation feature becomes 0.5% larger, on the Python
side only. Nothing crashes, and nothing warns you. This mismatch can happen
between two Python libraries before C is even involved.
The contract fixes the choice with "STD_DDOF": 0, and both
implementations read it from there. The alternating scene checks that they
actually follow it. Its readings alternate between +1000 and -1000 ticks,
so the population standard deviation is exactly 1000 ticks and the sample
version is about 1005. A small difference like that is easy to miss when
you read the numbers, which is exactly why a saved, exact answer is needed.
The missing-reading scenes
Sensors do not always deliver a reading. A sample can be dropped, a bus can time out, or a sensor can be briefly unavailable. The buffer still needs a value in that position, so the code puts a special marker there. A marker like this is called a sentinel.
Why the marker cannot be zero
The tempting choice is 0, because a buffer that has been cleared already holds zeros, so nobody has to write any code to produce it.
The problem is that 0 is also a perfectly valid reading. An accelerometer axis that is level reads close to zero, and a gyroscope that is not rotating reads zero. If 0 means “missing”, the model cannot tell the difference between “no data” and “a real measurement of nothing happening”.
So the contract uses -32768 instead:
"SENTINEL_MISSING": -32768.0,The sensor reports each reading as a signed 16-bit integer, which can hold whole numbers from -32768 to 32767. The sentinel is the lowest of those. That raises a fair question: what if the sensor reports -32768 as a real reading? Some sensors do, when a reading reaches the limit of their measuring range. The solution is for the code that reads the sensor to clamp every real reading to -32767 or above before storing it. That reserves -32768 to mean “missing” and nothing else. The cost is one value out of 65,536, at the very edge of the range.
Check for the marker before converting units
There is a second trap. The sentinel is a marker, not a measurement, so it must never be converted into real units. If it were, -32768 ticks divided by 4,096 ticks per g would become -8.0 g, which looks like a plausible reading, and it would then be treated as one.
Both implementations must therefore check for the sentinel first, on the raw value, and only then convert the readings that remain. The C code does it like this:
if ((float)raw[i][ch] == SENTINEL_MISSING) {
    continue;
}
const float v = (float)raw[i][ch] * scale;
This is obvious once someone says it, and easy to get wrong in a code review, because the wrong order looks just as reasonable.
Three scenes cover this behaviour from different directions. In
some_missing, a few readings in every channel are marked as missing, and
the statistics must be calculated from the remaining readings only. In
all_missing, one channel is missing for the whole window, so there is
nothing to calculate, and all four of its features must be reported as the
sentinel instead of an invented number. And all_zero checks the opposite
case: a window full of real zeros must be treated as real data, not thrown
away as missing.
How do you know the test works?
You cannot tell by reading the test. A well-designed golden test and a useless one both print “0 failures”. The only reliable way to find out is to break the code on purpose and see whether the test notices.
The script sabotage.py does exactly this. It makes one small, deliberate
change to features.c, rebuilds the C test, checks that the test now
fails, and puts the original code back. It repeats this for ten
different changes.
Every change is a mistake that a capable engineer could realistically make. None of them is a random typo.
| Sabotage | What it changes | Failures | Scenes that caught it |
|---|---|---|---|
ddof | Uses the sample standard deviation formula | 22 | 5 |
layout | Writes results in the wrong order | 80 | All 10 |
sentinel_zero | Reports a missing channel as 0 | 4 | 1: all_missing |
sentinel_included | Averages missing readings in as real values | 22 | 2 |
scale_swap | Swaps the accelerometer and gyroscope conversions | 90 | 9 |
scale_copy_paste | Gives one gyroscope channel the accelerometer conversion | 30 | 9 |
minmax_swap | Swaps the minimum and maximum | 60 | 5 |
minmax_init_zero | Starts the minimum and maximum at 0 | 38 | 7 |
off_by_one | Skips the last reading of every window | 46 | 5 |
zero_as_missing | Treats a reading of 0 as missing | 33 | 2: all_zero, ramp |
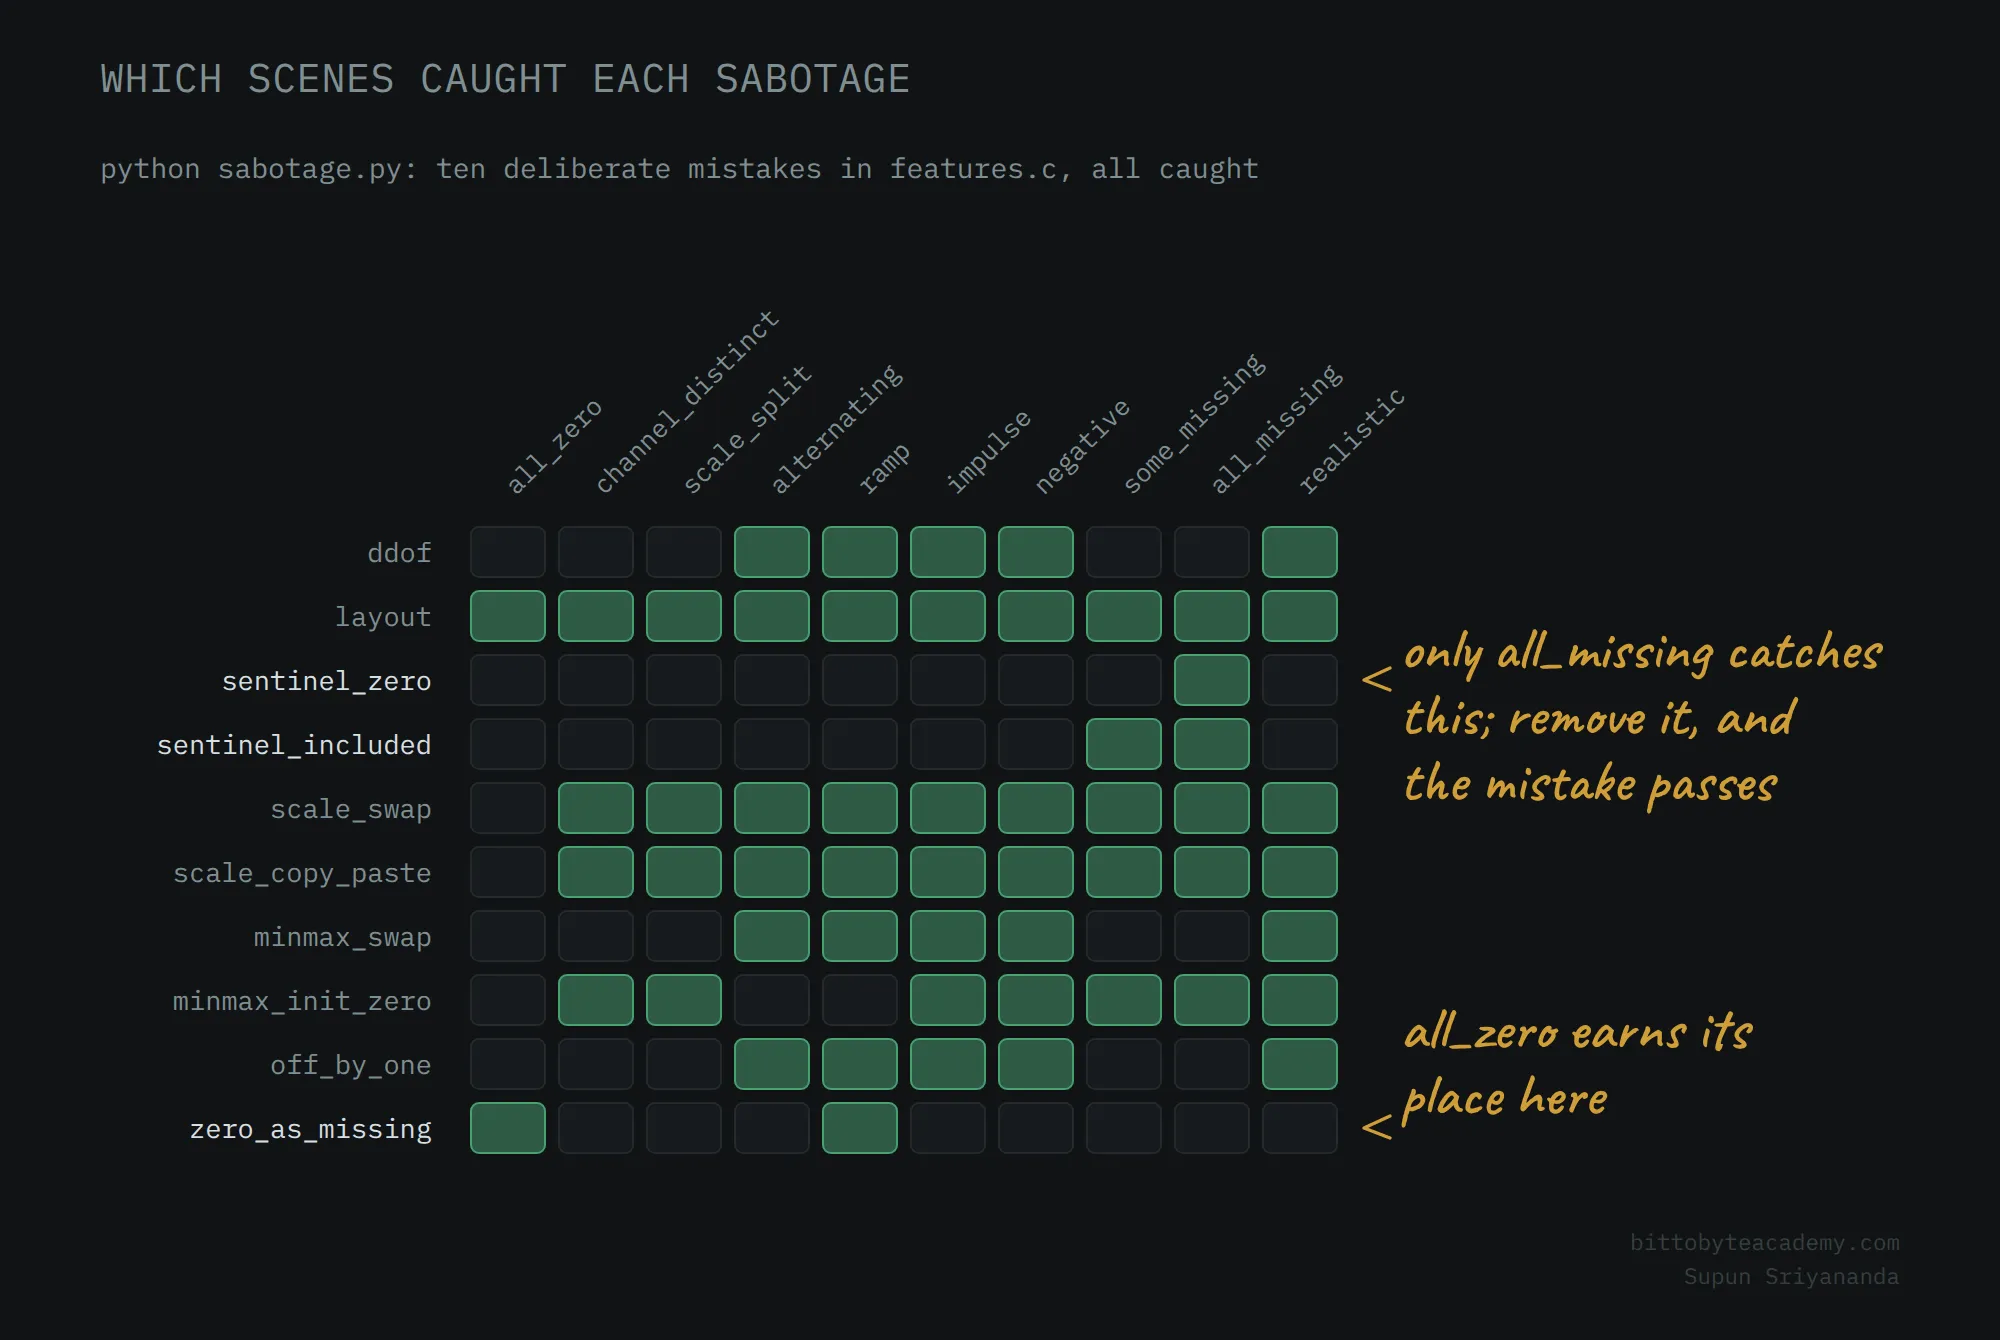
All ten were caught. The full output of python sabotage.py also names
every scene that caught each sabotage.
What the results tell you
The most useful information in the table is not that everything was caught. It is which scenes caught each mistake.
Look at sentinel_zero. Exactly one scene caught it: all_missing. That
tells you all_missing is doing essential work. If it were removed to save
time, a missing channel reported as zero would pass the test silently.
Without running the sabotage script, there would be no way to know which of
the ten scenes are essential.
zero_as_missing is similar. Only two scenes caught it: all_zero, which
was designed for it, and ramp, which happens to start at zero. Remove
all_zero, and that protection would rest on a detail of another scene
that nobody chose for this purpose.
Some mistakes are caught by many scenes. layout writes every value into
the wrong position, and it fails in all ten. This mistake deserves
attention because no individual number looks wrong. Every value is present
and correct, just in the wrong place, so only a test that knows the exact
position of each feature can see it.
minmax_init_zero is caught by seven scenes, for a reason that is worth
understanding. Starting the minimum and maximum at zero is a common way to
write that loop, and it works whenever the data crosses zero. When every
value in a channel is positive, the minimum wrongly stays at 0. When every
value is negative, the maximum wrongly stays at 0. Several scenes have
channels that are entirely on one side of zero, so several catch it. The
negative scene makes sure the all-negative case is always tested.
If a sabotage is ever reported as MISSED, the test has a blind spot. That
is a real mistake your golden vectors cannot see, and the fix is to add a
scene that targets it.
What this cannot tell you
The sabotage script only proves that the test catches the mistakes someone thought to try. It cannot prove that no other mistake exists. Running it is still far better than trusting a test that has never been seen to fail, and the list can grow: whenever a real bug slips through in your own project, add it as a new sabotage so the same mistake can never pass unnoticed again.
Try it yourself
From the 01-contract folder:
python sabotage.py --list   # describe all ten sabotages
python sabotage.py          # run all ten
python sabotage.py ddof     # run just one
The script always restores features.c when it finishes, and it checks
that the test passes again afterwards.
The next post covers the last of the three checks: values that nobody has decided yet, and why the firmware should refuse to compile until someone does.
Comments